Created: 12.04.2015 15:38 Last Modified: 15.04.2015 10:24
Views: 36770
Keywords: Cloud, connect, device, ESP8266, HTTP, IoT, MQTT, server, web
Connecting ESP8266 to Cloud with MQTT
Introduction
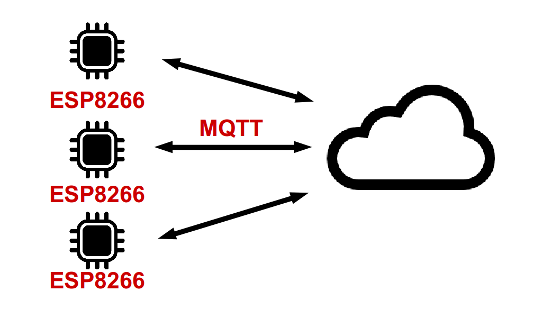
In the previous article I have revealed how to set up MQTT broker in a Linux container from kyup.com and today I will connect ESP8266 to it. ESP8266 is low cost micro controller with a WiFi. The affordable prices makes it appropriate for Internet of Things (IoT). I am using open source hardware version from Olimex. I have already explained how to get started with Olimex MOD-WIFI-ESP8266-DEV in an another article.
MQTT is a publish-subscribe machine to machine connectivity protocol. It is suitable for Internet of Things (IoT) as it works properly behind NAT. ESP8266 connects to the local WiFi router and through it to Mosquitto - an open source MQTT broker that I have deployed on the cloud.
Using the open source project ESP8266-jadja I am connecting a device powered by ESP8266 to the MQTT broker in the cloud. This source code combines two other popular open source projects to provide a web server for the configuration of the gadget and MQTT client to connect to the cloud.
How does it work?
ESP8266-jadja has two modes: web server or MQTT client. The setup of these Internet of Things includes three simple steps:
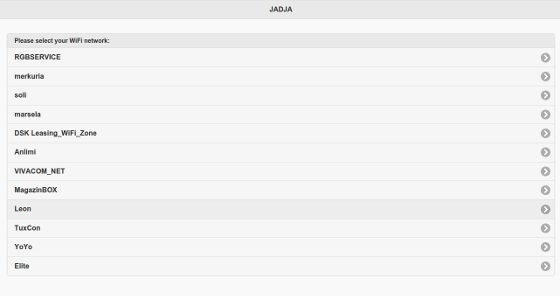
The user has to turn on the device and to connect to its open WiFi network from a personal computer, a smartphone or a tablet.
The user must launch a web browser and to visit http://192.168.4.1/
The user has to select his local WiFi network and to type in its password.
In web server mode the device will offer an user friendly HTML5 web page for configuration with a responsive design that fits well on different form factors and devices. When the user clicks the connect button on the web page ESP8266 will save the configurations and will reboot. The open network created by ESP8266 will be shutdown. The device will read the saved configurations so it will connect to the local WiFi and after that it will try to establish a connections with the MQTT broker.
If everything is OK there will be steady green light. Otherwise, if the WiFi credentials are not configured or if ESP8266 is unable to connect to the cloud then the green light will be blinking.
How to reconfigure?
If you want to change the WiFi network credentials on ESP8266 just hold GPIO0 to low for 5 seconds to wipe out the existing configurations. After that the gadget will automatically reboot again in a web server mode. In a real life products a hardware button should be added to GPIO to simplify the usage for end consumers.